Nowadays, it’s getting rare and even a bit annoying when a service rolls up its own authentication mechanism instead of relying on a OAuth sign-on with our social networks.
Login via social networks means fewer passwords to remember, and stronger guarantees in terms of security because you can check and control the authorizations of the applications you use.
In this article, I will show you how to allow users to log into your application via Twitter from a rich Javascript client (React).
We will also persist our users connections in database.
The code is available on github.
Setting up your app on Twitter
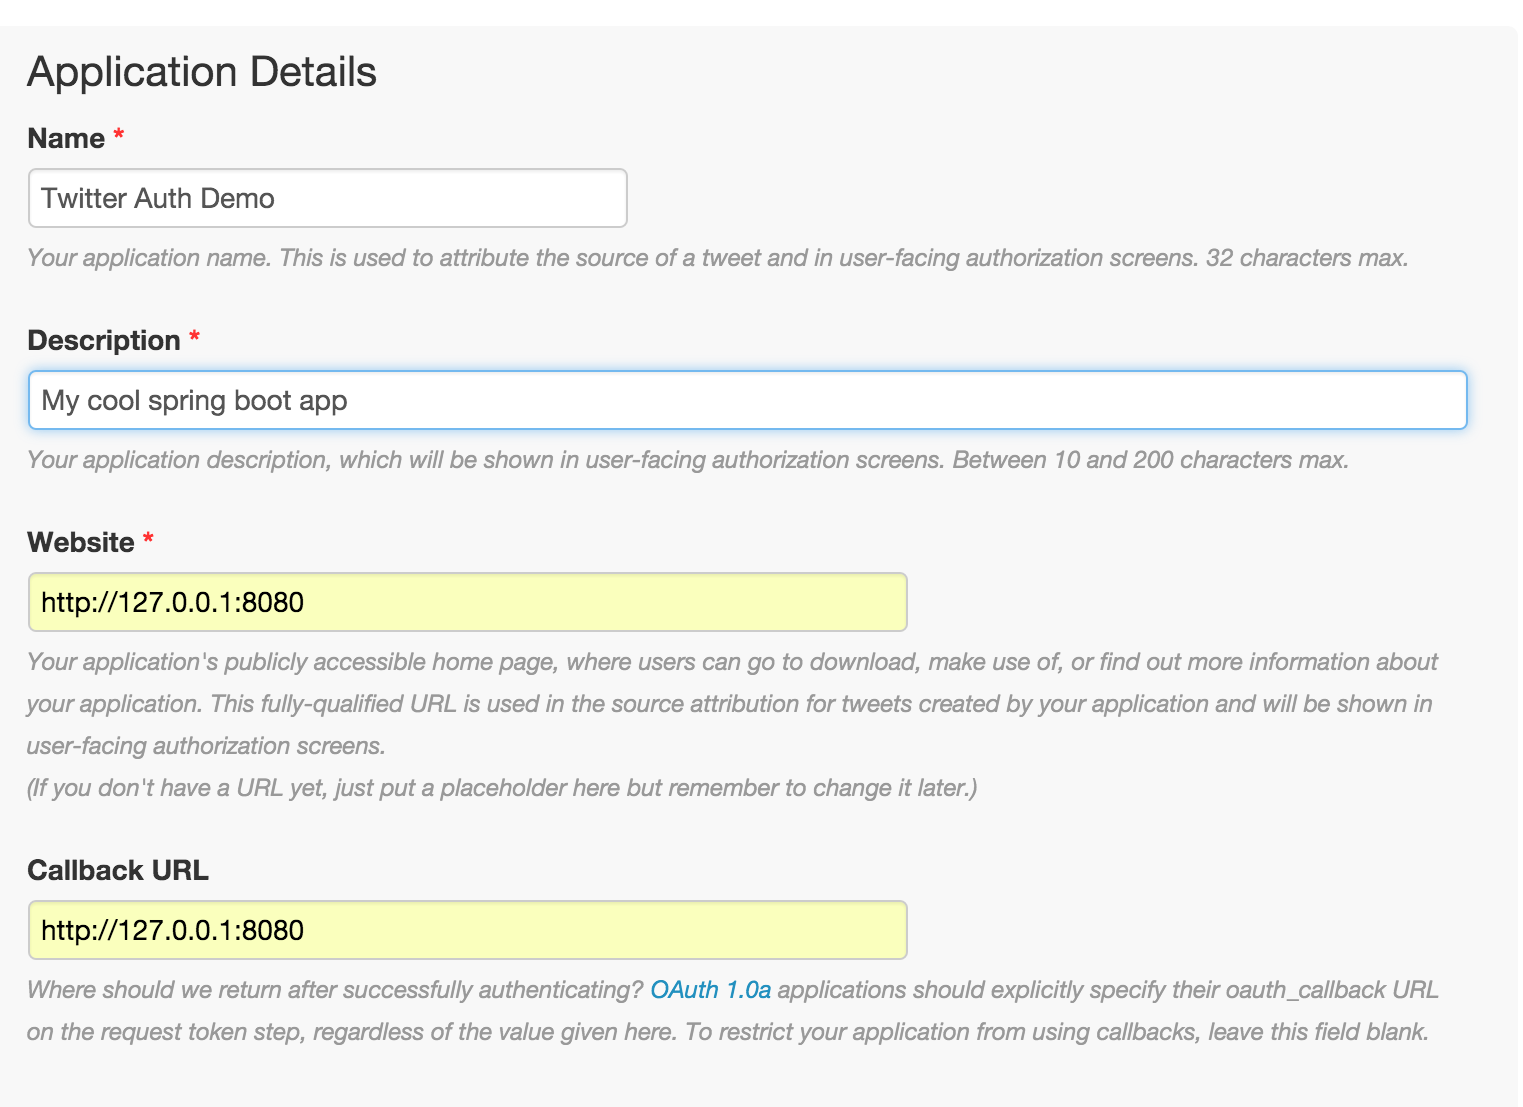
Before coding anything, you will need to create a new Twitter application in your twitter apps page.

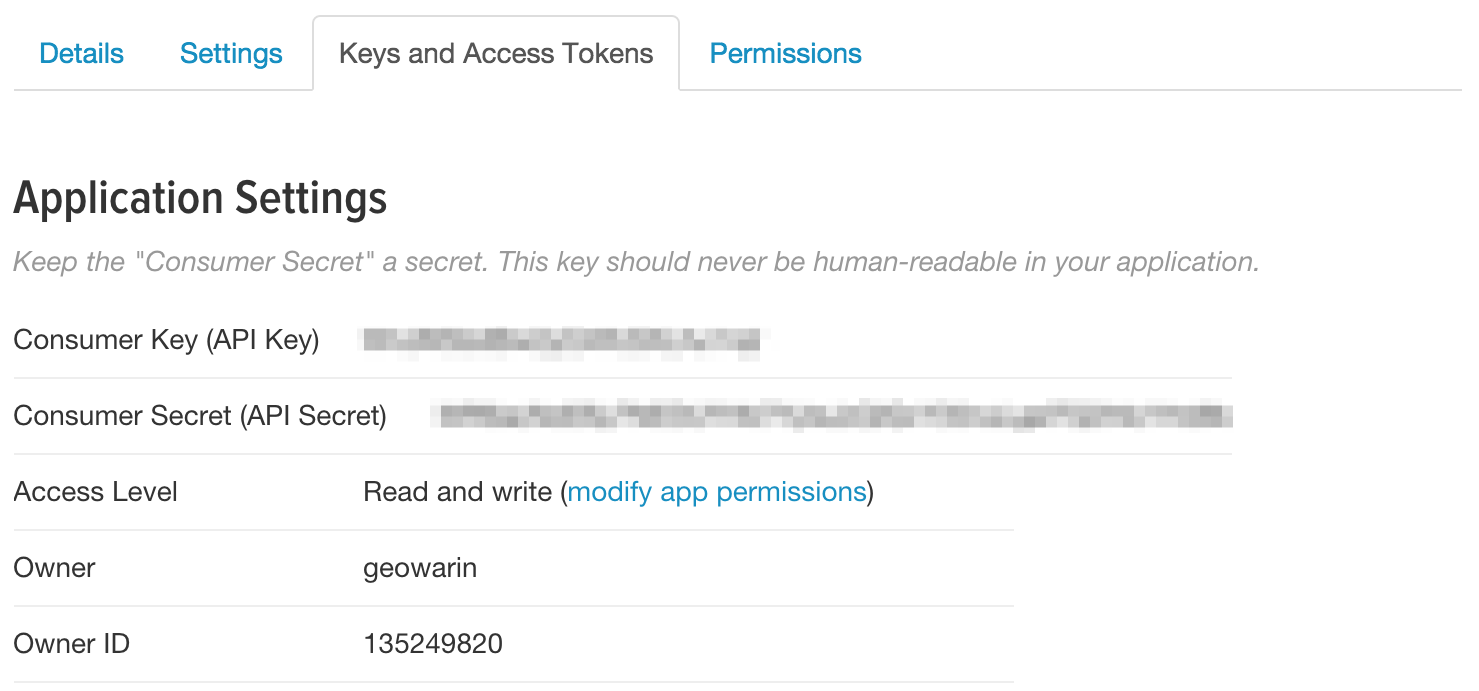
Then go to the “Keys and access tokens” tab and note your API key and API secret ids.

Creating a Spring Boot app
Use the Spring initializer to create a new Spring Boot application. You will need the following dependencies:
dependencies {
	compile('org.springframework.boot:spring-boot-devtools')
	compile('org.springframework.boot:spring-boot-starter-security')
	compile('org.springframework.boot:spring-boot-starter-social-twitter')
	compile('org.springframework.boot:spring-boot-starter-web')
	compile('org.springframework.boot:spring-boot-starter-jdbc')
	compile('com.h2database:h2')
}
Please copy your appId and appSecret in the application.properties file and
configure a few things:
spring.social.twitter.appId= <Consumer Key>
spring.social.twitter.appSecret= <Consumer Secret>
# Disable auto views, we are making an API
spring.social.auto-connection-views=false
# Disable basic security
security.basic.enabled=false
# Persist H2 data to disk to keep connection info between reboots
spring.datasource.url=jdbc:h2:~/social-test
Sign-in and Sign-up flows
Spring social has two different flows when someone logs into your app via social networks.
The first time someone logs into your application, they will go through the sign-up flow. If their ID already registered in Spring Social, they will go through the sign-in flow instead.
You job is to create a SignInAdapter that will handle the sign-in process and
a controller that will decide what to do during the sign-up process (you will receive a
request on the /signup URL by default).
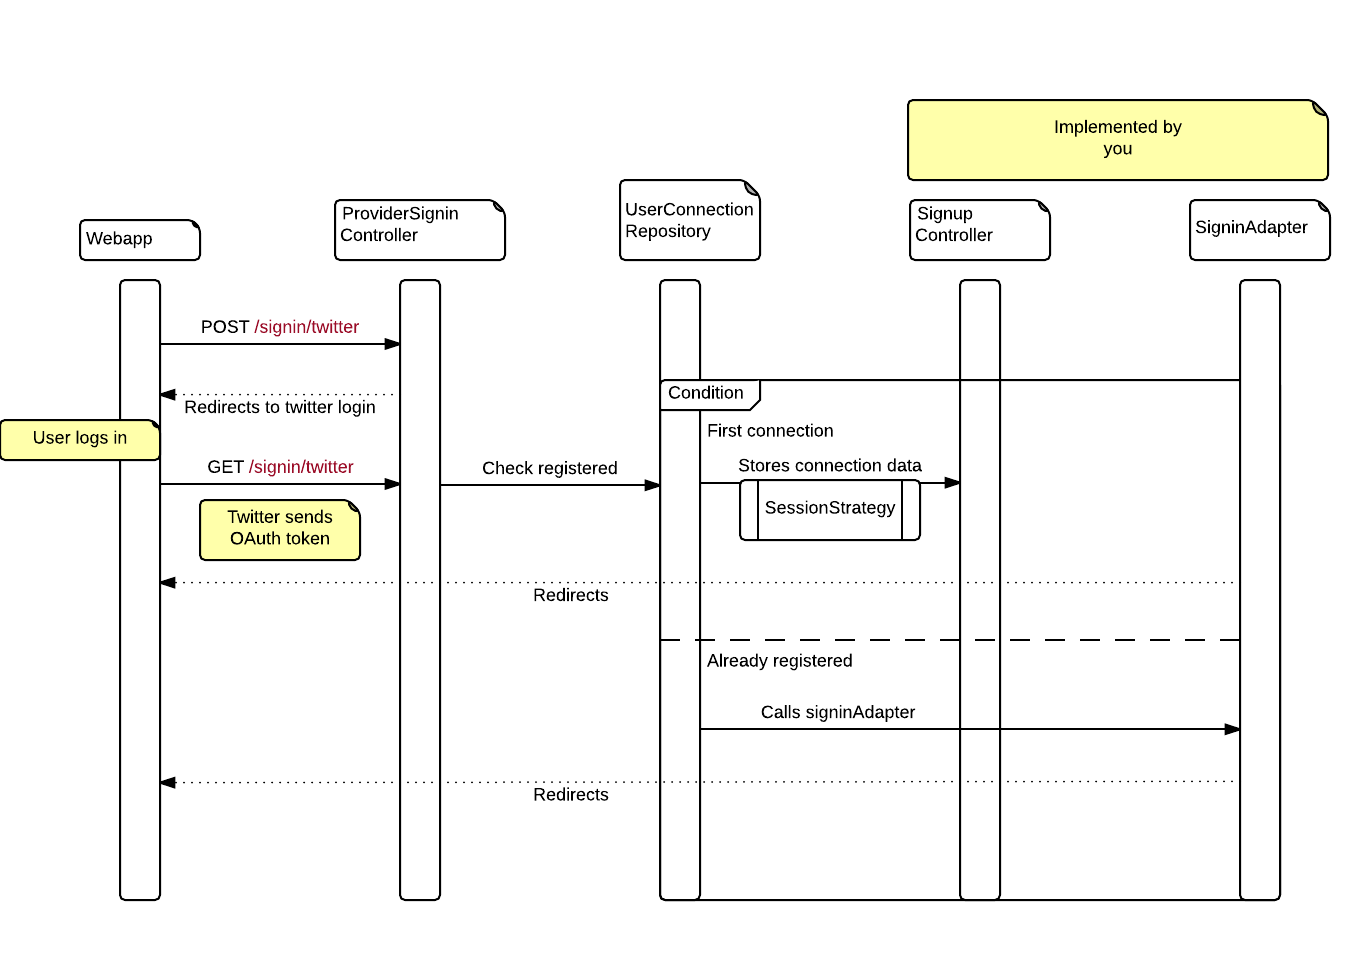
Here is an overview of the authentication flow in Spring Social:

- Your application produces a POST request to
/signin/{providerId} - The
ProviderSigninControllerthen redirects the user to the identification provider’s sign-in screen - The user logs in
- The identification provider will send the OAuth token with GET request to
/signin/{providerId} - If the user is not found in the
UsersConnectionRepository, the controller will use aSessionStrategyto store the pending login request and will then redirect to the signupUrl page - If the user is found, your
SignInAdapterinterface is called
If you want to know more details about Spring social inner workings, check the SocialWebAutoConfiguration class of Spring Boot and the ProviderSignInController class
of Spring Social.
In the above diagram, we can see that we have two more extensions points:
- The
SessionStrategy. By default, it stores temporary information about the connection in the HTTP session - The
UsersConnectionRepository. By default, Spring boot provides anInMemoryUsersConnectionRepository. Connections will be lost when your application reboots.
Spring Security Config
We need to enable security in our application. Let’s create a classic security
configuration.
It will make sure that users using our REST api are authenticated but will let calls
to /api/session, our authentication end point, go through:
@Configuration
@Order(SecurityProperties.ACCESS_OVERRIDE_ORDER)
public class SecurityConfiguration extends WebSecurityConfigurerAdapter {

    @Override
    protected void configure(HttpSecurity http) throws Exception {
        http
                .authorizeRequests()
                .antMatchers("/api/session").permitAll()
                .antMatchers("/h2-console/**").permitAll()
                .antMatchers("/api/**").authenticated()
                .and()
                .headers().frameOptions().disable() // for h2
                .and()
                .requestCache()
                .requestCache(new NullRequestCache())
                .and()
                .sessionManagement().sessionCreationPolicy(SessionCreationPolicy.IF_REQUIRED)
                .and().csrf().disable();
    }
}
The authentication end point is very simple. It provides a way to GET the
current session and to DELETE it to logout:
@RestController
@RequestMapping("/api/session")
public class AuthenticationResource {
    @Autowired
    AuthenticationManager authenticationManager;

    @RequestMapping(method = RequestMethod.GET)
    public User session(Principal user) {
        String name = user == null ? null : user.getName();
        return new User(name);
    }

    @RequestMapping(method = RequestMethod.DELETE)
    public void logout(HttpSession session) {
        session.invalidate();
    }
}
Sign-in
To handle the sign-in, we need to provide a SignInAdapter:
@Configuration
public class SocialConfiguration {

    @Bean
    public SignInAdapter authSignInAdapter() {
        return (userId, connection, request) -> {
            AuthUtil.authenticate(connection);
            return null;
        };
    }
}
We can create a simple authenticate method that will take a Social Connection
and authenticate the user using Spring Security’s context:
public class AuthUtil {
    protected static final Logger log = LoggerFactory.getLogger(AuthUtil.class);

    public static void authenticate(Connection<?> connection) {
        UserProfile userProfile = connection.fetchUserProfile();
        String username = userProfile.getUsername();
        UsernamePasswordAuthenticationToken authentication = new UsernamePasswordAuthenticationToken(username, null, null);
        SecurityContextHolder.getContext().setAuthentication(authentication);
        log.info("User {} {} connected.", userProfile.getFirstName(), userProfile.getLastName());
    }
}
Note that we have access to our user’s profile with the Connection
object.
Sign-up
Here is a simple implementation of a signup controller:
@Controller
public class SignupController {
    private final ProviderSignInUtils signInUtils;

    @Autowired
    public SignupController(ConnectionFactoryLocator connectionFactoryLocator, UsersConnectionRepository connectionRepository) {
        signInUtils = new ProviderSignInUtils(connectionFactoryLocator, connectionRepository);
    }

    @RequestMapping(value = "/signup")
    public String signup(WebRequest request) {
        Connection<?> connection = signInUtils.getConnectionFromSession(request);
        if (connection != null) {
            AuthUtil.authenticate(connection);
            signInUtils.doPostSignUp(connection.getDisplayName(), request);
        }
        return "redirect:/";
    }
}
There are two things to note here:
- Spring lets us decide what to do the first time we register a user. In this example, we just authenticate him
- The
SignInUtilsclass is very handy to handle this scenario. Its constructor optionally takes aSessionStrategythat will be used to retrieve the connection info. You can customize the strategy here.
A this point, your authentication process should work. It will use the HTTP Session to store connection data and an in-memory user repository.
The client
We can create a very simple client with any web framework. It will need to:
- Issue a
GET /api/sessionrequest to check if the user is logged - Display a login form that will
POSTto/login/twitterif not - Display a logout button if the user is connected. The logout button will
send a
DELETE /api/sessionrequest.
I chose to use React because of its very simple and declarative API.
We can use ES2015 features and JSX without a pre-compilation step thanks to this script.
It is a bit slower because it lets the browser do the compilation but it’s perfect for prototyping.
Here is the client code:
const LoginForm = () => (
    <form action="/signin/twitter" method="post">
        <h1>Please login</h1>
        <button type="submit">Login</button>
    </form>
);

const LogoutComponent = (props) => (
    <div>
        <h2>Your name is {props.name}</h2>
        <button onClick={props.logout}>Logout</button>
    </div>
);

class Main extends React.Component {

    constructor(...args) {
        super(...args);
        this.state = {name: null};
    }

    componentDidMount() {
        fetch('/api/session', {credentials: 'same-origin'})
            .then(res => res.json())
            .then(session => this.setState({name: session.name}));
    }

    logout() {
        console.log("logout");
        fetch('/api/session', {method: 'delete', credentials: 'same-origin'})
            .then(res => this.setState({name: null}));
    }

    render() {
        const profile = this.state.name ?
            <LogoutComponent name={this.state.name} logout={() => this.logout()}/> :
            <LoginForm />;
        return (
            <div>
                {profile}
            </div>
        )
    }
}

ReactDOM.render(<Main />, document.getElementById('container'));
We use the fetch API (a modern replacement for XMLHttpRequest) to make ajax calls so the code will only work in FF and Chrome. You can find various polyfills in the wild.
Notice that we need to pass {credentials: 'same-origin'} to the REST API calls
to make sure we send the cookies along with the requests.
Store the connections in database
In most applications, we want to store the user already known in a database.
Spring social provides a default JDBC implementation of the UsersConnectionRepository.
Take a look the documentation
to know more about the table in which it will store users’ connections data.
We can initialize the database with the script contained in Spring Social’s jar:
@Component
public class DbInitializer implements InitializingBean {

    private final DataSource dataSource;

    @Autowired
    public DbInitializer(DataSource dataSource) {
        this.dataSource = dataSource;
    }

    @Override
    public void afterPropertiesSet() throws Exception {
        ClassPathResource resource = new ClassPathResource("org/springframework/social/connect/jdbc/JdbcUsersConnectionRepository.sql");
        runScript(resource);
    }

    private void runScript(Resource resource) {
        ResourceDatabasePopulator populator = new ResourceDatabasePopulator();
        populator.setContinueOnError(true);
        populator.addScript(resource);
        DatabasePopulatorUtils.execute(populator, dataSource);
    }
}
Now, we need to create a SocialAdapater that will use Spring Social’s
JdbcUsersConnectionRepository as a user repository:
class DatabaseSocialConfigurer extends SocialConfigurerAdapter {
    private final DataSource dataSource;

    public DatabaseSocialConfigurer(DataSource dataSource) {
        this.dataSource = dataSource;
    }

    @Override
    public UsersConnectionRepository getUsersConnectionRepository(ConnectionFactoryLocator connectionFactoryLocator) {
        TextEncryptor textEncryptor = Encryptors.noOpText();
        return new JdbcUsersConnectionRepository(dataSource, connectionFactoryLocator, textEncryptor);
    }
}
Don’t forget to declare our DatabaseSocialConfigurer as a Spring bean and we are
good to go!
Please note that this works because of an “interesting” design decision of
Spring Social.
You can see here
that Spring Social will take the first SocialConfigurer that declares a non-null
UsersConnectionRepository.
Ours come before the SocialConfigurers auto-configured by Spring Boot but
if you are wary of this implementation, consider disabling Spring boot auto-configuration.
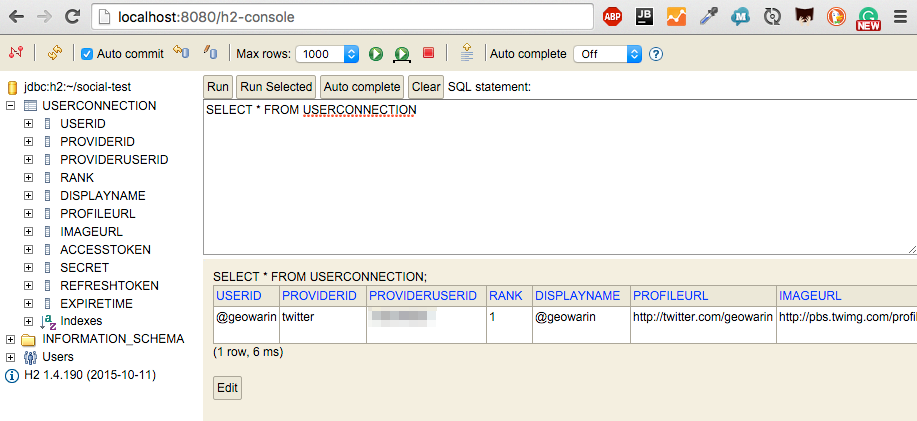
We can use the h2 console Spring boot auto-configured for us to check the database.

Conclusion
Social login with Spring is a bit tricky but definitely worth the investment!
Spring Boot provides default configuration for LinkedIn and Facebook as well but there are many more connectors like Github and Tripit that you can include by replicating Spring Boot’s configuration.
Don’t forget to check out the code and give your opinion in the comments.